
Shipping is one of the fastest ways to lose a sale in WooCommerce, confusing checkout fields, unexpected costs, missing delivery options, or “no shipping methods available” errors all push buyers away. The good news: WooCommerce shipping is highly configurable once you understand zones, methods, classes, and how rates are calculated.
In this guide, you’ll learn how to set up WooCommerce shipping the right way so customers see clear shipping options in WooCommerce, your margins stay protected, and your store can scale to new regions and carriers.
Free shipping on the initial subscription checkout (parent order)
- Go to WooCommerce → Settings → Shipping → Zones and open the zone your subscribers will use.
- Add a Free Shipping method to that zone.
- In the Free Shipping method settings, set Free shipping requires = “A valid free shipping coupon” (or “Minimum order amount” if you’re using a threshold).
- Create a coupon in Marketing → Coupons and enable Allow free shipping on that coupon (this is what makes it a “valid free shipping coupon”).
- (Optional) Restrict the coupon so it only works for subscription products (product/category restrictions + usage limits).
This gives customers a clean way to get free shipping when they subscribe without changing your entire shipping structure.
Free shipping on renewal orders (recurring shipments)
WooCommerce doesn’t provide a built-in switch to limit free shipping only to renewal orders automatically. A common approach is using conditional shipping logic (plugin or custom code) to show Free Shipping only for renewal packages.
A widely used method is a rules-based restriction plugin (e.g., “Conditional Shipping and Payments”) to:
- keep regular orders on paid shipping, and
- Make renewals ship free (or hide other shipping methods on renewals).
Give Customers a Free Shipping Coupon for a Subscription
If your goal is “customer enters a coupon → free shipping appears,” do this:
- Shipping zone setup
- WooCommerce → Settings → Shipping → Zones
- Open the zone and ensure Free Shipping is added.
- Set Free shipping requires = A valid free shipping coupon.
- Coupon setup
- Marketing → Coupons → Add coupon
- Enable Allow free shipping (this is the key).
- Add any restrictions you want (subscription product/category only, minimum spend, first-time use, etc.).
 Important Note About Subscriptions + Coupons
 Important Note About Subscriptions + Coupons
WooCommerce Subscriptions supports specific “recurring discount” coupon types for subscription pricing, but free shipping is handled through shipping methods + the “free shipping coupon” flag. In many setups, a free-shipping coupon mainly impacts the initial checkout unless you add conditional rules for renewals.
Why Shipping Configuration Matters in WooCommerce
Shipping is one of the most important (and most overlooked) parts of a high-performing WooCommerce store. When it’s configured correctly, customers see clear delivery choices and accurate pricing at checkout, building trust and reducing friction. When it’s not, shoppers hesitate, abandon carts, or contact support with avoidable questions.
A strong shipping setup directly impacts the business outcomes that matter most:
- Conversion rate: Transparent pricing and reliable shipping options reduce checkout abandonment and increase completed orders.
- Profitability: When rules are set correctly, you avoid undercharging (or overcharging) and protect your margins across different products and locations.
- Customer satisfaction: Accurate delivery expectations help prevent complaints, refunds, and negative reviews.
- Operations: A well-structured shipping system keeps fulfilment organized especially when you’re printing labels, managing tracking, and standardizing order statuses.
Many store owners begin by trying to add shipping in WooCommerce, then quickly realize it’s not a single switch. Shipping works as a complete system, zones + methods + rates + classes + calculations, and each piece needs to be aligned to create a smooth checkout experience.
Core Shipping Setup in WooCommerce (General Configuration)
To build a reliable foundation, you’ll want to start by properly organizing where you ship, how you ship, and what you charge. This is the core workflow most stores follow to set up WooCommerce shipping the right way:
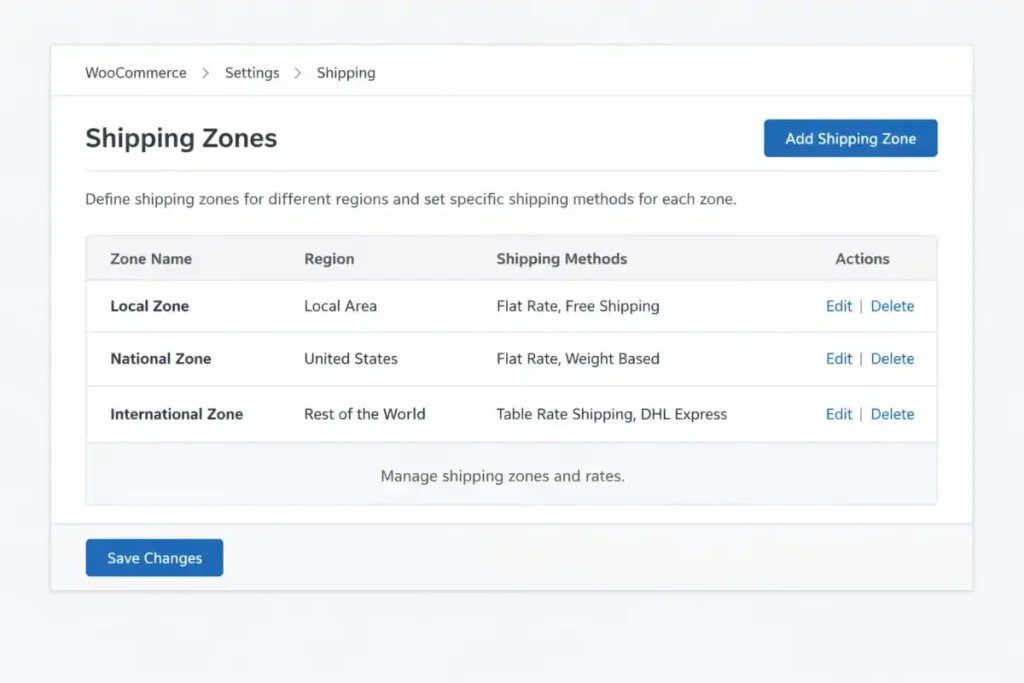
1) Configure Shipping Zones
Your first step is to add a shipping zone in WooCommerce. Shipping zones define where you ship (such as a country, state, or region). WooCommerce uses these zones to decide which shipping choices appear at checkout.
2) Add Shipping Methods to Each Zone
Once your zones are created, you can add a shipping method in WooCommerce for each one. Shipping methods define how you deliver orders, like flat rate, free shipping, local pickup, or carrier-calculated options. This is also where you set the shipping method in WooCommerce based on what makes sense for each location.
3) Add Shipping Options Customers Can Choose From
Within each zone, you can add shipping options in WooCommerce that match customer expectations, such as “Standard” and “Express”, and align those options with your pricing strategy and delivery timelines.
4) Complete the Shipping Configuration
When your zones and methods are in place, you’ve effectively configured shipping in WooCommerce at a foundational level. From there, you can refine rates, apply shipping classes for product-specific pricing, and ensure WooCommerce calculations reflect your real operational costs.
If you want your shipping setup to improve conversions and protect margins—not create checkout friction, work with a WooCommerce development agency to configure zones, methods, rates, and classes the right way for your products and fulfilment workflow.
How to Set Up WooCommerce Shipping the Right Way
Step 1: Set up Shipping Zones in WooCommerce (the foundation)
A shipping zone is where you ship to (country, state, ZIP/postcode). Most shipping issues happen because zones aren’t configured correctly.
What to do:
- Go to WooCommerce → Settings → Shipping → Shipping zones
- Add shipping zone (e.g., “United States,” “New York,” “International”)
- Assign regions (countries/states/ZIPs)
- Add shipping methods inside each zone
This is the real “configure shipping in WooCommerce” step, where zones determine which shipping methods your customers see.
Step 2: Add Shipping Methods in WooCommerce (what customers choose)
Inside each zone, you can add a shipping method in WooCommerce, such as:
- Flat rate
- Free shipping
- Local pickup
- Carrier-calculated rates (via plugins)
This is how you add different shipping options on WooCommerce without messy workarounds.
Shipping Rates & Charges: How to Control Costs Precisely
Shipping costs shouldn’t be a guesswork exercise. A well-structured pricing setup helps you protect margins, reduce cart abandonment, and keep your checkout experience consistent across locations. In WooCommerce, the most reliable way to manage pricing is to add shipping charges through your shipping methods. Hence, rates are rule-based, scalable, and easy to maintain as your catalogue grows.
How to Add Shipping Charges in WooCommerce
To set up shipping charges in WooCommerce, you’ll typically configure rates inside an existing shipping method, most commonly Flat Rate. This approach is popular because it offers predictable pricing and clean control without complicating the customer experience.
With Flat Rate, you can:
- Add shipping cost in WooCommerce as a single fixed fee per order for simple, consistent pricing.
- Set shipping cost in WooCommerce using formulas that adjust based on cart quantity, shipping classes, or specific product groups, ideal for mixed carts and variable handling needs
How to Change Shipping Cost in WooCommerce
As your costs shift (carrier increases, packaging changes, new margins), you’ll need the flexibility to update pricing quickly. To change the shipping cost in WooCommerce, edit the shipping method within the relevant zone:
WooCommerce → Settings → Shipping → Zones → select your zone → edit the method
This same workflow is also how you set different shipping rates in WooCommerce by region. So your domestic pricing, local delivery options, and international charges can be tailored without disrupting the checkout flow.
When shipping rates are configured correctly, customers see clear costs upfront, and your team avoids constant manual adjustments, resulting in a smoother checkout and a more scalable fulfilment operation.
Flat Rate Shipping: Best for Simplicity and Margin Control
Flat rate shipping is one of the most reliable ways to keep checkout pricing clear while protecting your margins. If you want customers to choose between clean, predictable options like “Standard Shipping $6.99” and “Express $14.99,” a flat rate is often the ideal setup, especially for stores that want consistent costs without complex calculations.
How to Set Up Flat Rate Shipping in WooCommerce
To set up flat rate shipping in WooCommerce, you’ll configure the method inside the appropriate shipping zone, then define the pricing rules that match your fulfilment costs.
A standard configuration flow is:
- Add flat rate shipping in WooCommerce by adding the Flat Rate method within your shipping zone.
- Set the base cost for that shipping option.
- Optionally, set flat rate shipping in WooCommerce with tiered pricing using shipping classes (useful for heavier, bulky, or premium-handling products)
When structured correctly, flat rate shipping gives you control and flexibility without cluttering the checkout experience. Most use cases are solved through a clean combination of shipping zones + flat rate method configuration, allowing you to scale pricing by region, product type, or cart conditions while keeping everything easy for customers to understand.
Free Shipping: When and How to Offer It Without Losing Money
 Free Shipping: When and How to Offer It Without Losing Money
Free shipping can be a powerful incentive, but only when it’s structured to support your margins and fulfilment workflow. When you offer free shipping on WooCommerce strategically, you can increase conversions, raise average order value, and reduce checkout hesitation without absorbing unnecessary costs.
How to Enable Free Shipping in WooCommerce
To enable free shipping in WooCommerce, you’ll add it as a shipping method within the correct shipping zone and attach a clear requirement so it triggers only when it makes sense for your business.
A practical way to set up free shipping in WooCommerce is:
- Add the Free Shipping method inside your shipping zone
- Configure the requirement (most commonly a minimum order amount)
This structure aligns with common customer search intent, including “add free shipping in WooCommerce,” “how to set free shipping in WooCommerce,” and “make free shipping after a certain amount in WooCommerce,” while keeping your pricing rules consistent and scalable.
Smart Ways to Use Free Shipping Without Sacrificing Profit
Most stores succeed with free shipping using one (or a mix) of these approaches:
- Minimum order threshold to increase cart value
- Free shipping on specific products when margins allow
- Zone-based rules where certain regions are cheaper to fulfil
How to Add Free Shipping to a Product in WooCommerce
WooCommerce doesn’t include a simple built-in switch to add free shipping to a product by default, but it can be implemented cleanly with the right setup. Common solutions include:
- Shipping classes combined with conditional logic plugins
- Coupon rules that unlock free shipping
- Table-rate configurations that exclude specific items or categories
If you want this handled without conflicts or hidden checkout issues, partnering with a WooCommerce development agency in New York often saves time. It ensures the logic works across mixed carts, discounts, and different customer locations.
How to Remove Free Shipping in WooCommerce
As promotions change, you may need to adjust or roll back free shipping rules. To remove free shipping without disrupting your checkout experience, you can:
- Remove the free shipping method from the zone
- Increase the threshold so it triggers less often
- Turn off the coupon or rule that activates it
With the right structure, free shipping becomes a controlled lever for growth, not a margin drain.
Shipping Classes: What They Are and When to Use Them
Shipping classes are a powerful way to bring structure and precision to your WooCommerce shipping strategy. They allow you to group products based on how they need to be shipped, such as weight, size, or special handling, so your pricing logic reflects real fulfilment costs without overcomplicating checkout.
When store owners ask what shipping classes in WooCommerce are or what a shipping class in WooCommerce is, the short answer is control. Shipping classes help you apply smarter pricing rules across mixed carts while keeping shipping options easy for customers to understand.
How to Create and Set Up Shipping Classes in WooCommerce
To create a shipping class in WooCommerce, you define the class at a global level and then assign it to the relevant products. Once applied, these classes integrate directly into your shipping methods, giving you granular pricing control without custom development.
To set up shipping classes in WooCommerce with real-world rates:
- Assign shipping classes to products that share similar handling requirements
- Edit your Flat Rate method within the appropriate shipping zone
- Apply class-based costs so items like bulky or fragile products are priced accurately
This approach is one of the simplest and most effective ways to protect margins while maintaining a clean, predictable checkout experience, especially as your product catalogue and order complexity grow.
Advanced Logic: Weight-Based and Table Rate Shipping
 Advanced Logic: Weight-Based and Table Rate Shipping
As your store grows, flat pricing often isn’t enough, especially when heavier products, mixed carts, or multi-region fulfilment start affecting your real shipping costs. That’s where advanced shipping logic becomes essential. With the right configuration, WooCommerce can reliably calculate rates based on rules that match how you actually ship, keeping checkout accurate and margins protected.
Add Weight-Based Shipping in WooCommerce
If shipping costs change significantly based on order weight, the most effective approach is to add weight-based shipping in WooCommerce using a dedicated plugin. This allows you to set up weight-based shipping in WooCommerce with structured rules (like tiered weight brackets) so customers automatically see accurate pricing at checkout without manual adjustments or inconsistent charges.
Set Up Table Rate Shipping in WooCommerce
For stores with more complex catalogues, table rate shipping offers the most flexibility. When you set up table rate shipping in WooCommerce, you can create rule-based pricing that scales across multiple conditions, including:
- Weight ranges
- Cart total ranges
- Item count
- Shipping classes
- Destination
This is often the cleanest solution for multi-region stores, varied product types, or businesses that need predictable logic across standard, expedited, and region-specific delivery options, all while maintaining a smooth and professional checkout experience.
How Does WooCommerce Calculate Shipping?
Shipping costs in WooCommerce aren’t random; they’re generated through a clear, rule-based flow. That’s why store owners frequently search for how WooCommerce calculates shipping and how to calculate shipping costs in WooCommerce when rates don’t look right at checkout.
WooCommerce calculates shipping in this order:
- The customer’s shipping address is used to match a shipping zone.
- That zone determines which shipping methods are available at checkout.
- Each method then calculates the final rate based on its configuration, whether that’s flat pricing, shipping class costs, or advanced plugin rules.
- Taxes may apply depending on your store’s tax and shipping settings.
Why Shipping Rates Sometimes Look Incorrect
When rates appear too high, too low, or don’t show at all, the cause is usually one of these common configuration issues:
- The customer address is matching the wrong shipping zone.
- A shipping method is missing, disabled, or misconfigured within that zone.
- A shipping class cost is overriding what you expected for certain products.
- A shipping plugin is applying extra logic in the background (rules, conditions, or exclusions)
When zones, methods, and class rules are structured properly, WooCommerce shipping becomes predictable and scalable, ensuring customers see the right options and the right pricing every time.
Carrier Integrations: UPS and FedEx in WooCommerce
For stores that need accurate, real-time pricing at checkout, carrier integrations are essential. By connecting WooCommerce directly with shipping providers, customers see live rates based on destination and order details, eliminating guesswork and improving trust during checkout.
Add UPS Shipping to WooCommerce
To add UPS shipping to WooCommerce, most stores rely on an official or well-supported plugin that connects your account directly to UPS services. This setup enables real-time rate calculations and allows customers to choose the delivery speed that fits their needs, while ensuring address data is validated before fulfilment.
Add FedEx Shipping to WooCommerce
The same approach applies when you add FedEx shipping to WooCommerce. With proper integration, you can enable live FedEx rates, offer multiple delivery options, and display accurate shipping costs in WooCommerce based on weight, package dimensions, and destination, all calculated automatically at checkout.
Carrier integrations are powerful, but they must be implemented and tested carefully to avoid cart or checkout inconsistencies. A skilled WooCommerce development company can configure UPS and FedEx integrations correctly, optimize performance, and ensure your checkout remains fast, reliable, and conversion-focused.
Checkout Shipping Address and Field Control
 Checkout Shipping Address and Field Control
Shipping form friction is a common reason customers abandon checkout. A clean, streamlined checkout experience builds trust, reduces errors, and makes it easier for buyers to complete their purchase, especially on mobile. That’s why many store owners focus on improving how they add a shipping address on WooCommerce checkout and how shipping fields appear based on product type and order flow.
Add Shipping Address on WooCommerce Checkout
By default, WooCommerce supports shipping to the billing address or a separate shipping address. When you customize this experience, you can simplify the form, reduce unnecessary fields, and align the checkout flow with how your store actually fulfills orders. Many brands also choose to add required fields for more reliable delivery details and fewer fulfilment issues.
Enable/Disable Shipping Address in WooCommerce
Depending on what you sell, you may need to enable the shipping address in WooCommerce so it always shows, or turn off the shipping address in WooCommerce entirely for digital-only checkouts. Stores also often refine the “ship to a different address” behavior to keep the checkout cleaner and reduce customer confusion.
These updates should be implemented carefully so taxes, payment processing, shipping calculations, and order confirmation emails remain accurate without creating unexpected issues in checkout logic or fulfilment workflows.
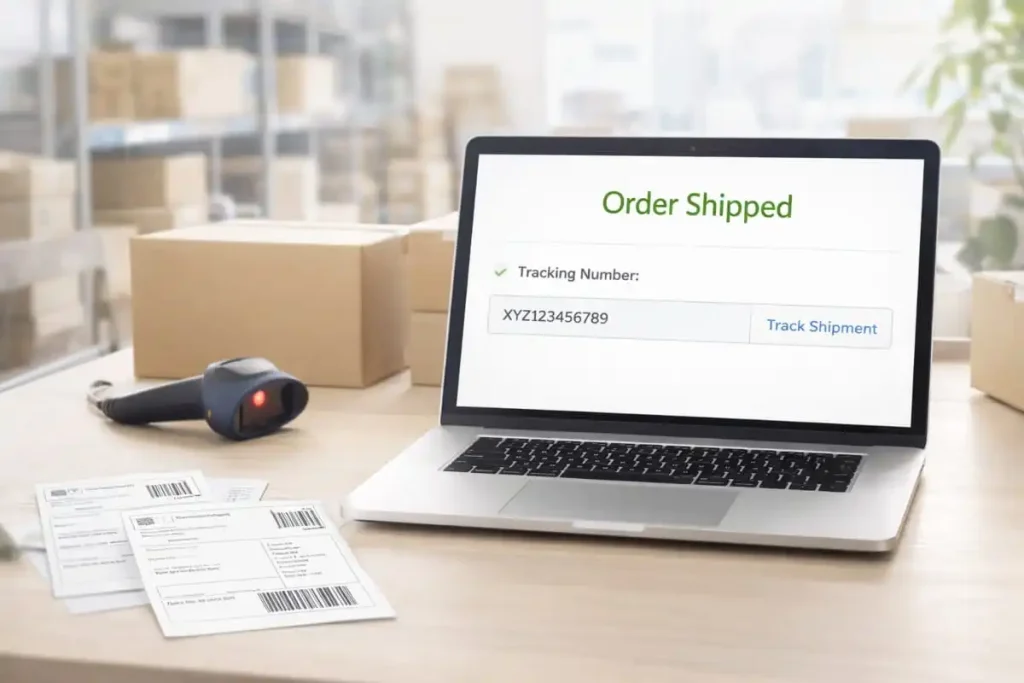
Shipping Labels and Fulfilment Workflow
A smooth fulfilment process isn’t just about shipping rates; it’s also about how efficiently your team can pack, label, and dispatch orders. When you print shipping labels from WooCommerce through a connected workflow, you reduce manual steps, minimize labelling errors, and speed up order handling as volume increases.
Print Shipping Labels from WooCommerce
To streamline fulfilment, many WooCommerce stores use shipping label plugins that connect directly to shipping platforms or individual carriers. This approach typically supports:
- Batch label printing for multiple orders at once
- Automatic tracking syncs back into WooCommerce
- Reduced manual entry for addresses, weights, and service selection
If you’re searching for “print shipping labels from WooCommerce,” the goal is usually to implement a label and tracking system that matches your fulfilment volume, shipping carriers, and daily operations so orders move faster while customers stay informed automatically.
Add a Shipped Order Status in WooCommerce
By default, WooCommerce does not include a dedicated “Shipped” order status, which is why many store owners look for ways to add a shipped order status in WooCommerce. Introducing this status helps create a clearer separation between orders that are merely processed and those that have actually left your warehouse.
A shipped status improves internal workflow by giving your team better visibility into fulfilment progress, while also enhancing customer communication, especially when paired with automated tracking notifications. When implemented correctly, it allows you to manage orders more efficiently, reduce support inquiries, and maintain a more professional post-purchase experience.
Actionable Tips to Improve WooCommerce Shipping (Quick Wins)
 Actionable Tips to Improve WooCommerce Shipping (Quick Wins)
Small, well-planned adjustments to your shipping setup can deliver immediate improvements in checkout performance and operational efficiency. These practical steps help ensure your WooCommerce shipping remains scalable, predictable, and customer-friendly:
- Create a minimum of three shipping zones: local or primary market, national coverage, and international destinations, to keep pricing and availability controlled.
- Offer at least two shipping options at checkout, balancing a cost-effective choice with a faster delivery option.
- Use free shipping strategically by setting a threshold slightly above your average order value to increase cart size without eroding margins.
- Apply shipping classes to manage higher costs for bulky, heavy, or special-handling products.
- Test edge cases regularly, including different ZIP codes, mixed-product carts, coupons, and mobile checkout flows
- Keep shipping labels and tracking automated to reduce “where is my order?” support requests.
- Document your shipping rules and logic so future updates don’t unintentionally disrupt pricing or checkout behaviour.
These quick wins help transform shipping from a potential friction point into a streamlined, revenue-supporting part of your WooCommerce store.
Book a Free Consultation
Want expert help setting up shipping zones, shipping classes, flat rate/free shipping rules, and carrier integrations without breaking checkout?
Book a free consultation today and let our team guide your store toward a faster, cleaner, higher-converting shipping experience through our WooCommerce e-commerce development service in the USA.
Conclusion
When you set up WooCommerce shipping correctly, zones, methods, rates, and classes, you reduce friction, protect profit, and give customers confidence at checkout. Whether you’re trying to add shipping options in WooCommerce, set up international shipping, integrate UPS/FedEx, or fine-tune how WooCommerce calculates shipping, the goal is the same: make delivery simple, accurate, and predictable.
If you want shipping configured professionally (and your store built to scale), work with a WooCommerce website development agency that can implement best-practice shipping architecture, optimize checkout UX, and ensure everything performs reliably.
Frequently Asked Questions (FAQ’s)
Enable Free Shipping in the customer’s shipping zone and set its requirement to “a valid free shipping coupon” or “minimum order amount.” Then ensure the subscription product is shippable and the customer’s address matches the correct shipping zone. Free shipping appears at checkout when the requirement is met.
WooCommerce shipping methods apply to renewal orders the same way they apply to normal orders, based on zones, methods, and eligibility rules. If you need free shipping only on renewals while keeping paid shipping for one-time purchases, you must use conditional shipping rules (plugin or custom logic) to restrict methods by order type.
Create a coupon and enable the “Allow free shipping” option on the coupon. In your shipping zone, add the Free Shipping method and set it to require a valid free shipping coupon. The coupon then unlocks the Free Shipping method at checkout when applied.
Free shipping does not show when the customer’s address does not match a shipping zone that contains a Free Shipping method. It also does not show when the Free Shipping method requirement is not met (coupon not applied or minimum not reached). Confirm the subscription product requires shipping and the zone configuration matches the customer’s destination.
WooCommerce shipping zones and methods do not distinguish subscription vs one-time purchases by default. Use conditional shipping rules to show Free Shipping only when the cart contains a subscription product, and hide it for non-subscription carts. This keeps checkout options consistent and prevents free shipping from being available on regular orders.
Set the Free Shipping method requirement to “minimum order amount” inside the relevant shipping zone. The subscription checkout qualifies for free shipping when the cart total meets or exceeds that threshold. Confirm taxes and discounts are configured as intended, since thresholds evaluate the order total based on store settings.
A free shipping coupon affects shipping on the order where the coupon is applied. Renewals are created as separate orders, so the coupon does not carry forward unless your setup explicitly applies it to renewals via subscription coupon rules or custom logic. Verify renewal behaviour by placing a test subscription and checking the first renewal order.
Limit the coupon using product or category restrictions so it only applies to your subscription items. Add additional constraints, such as usage limits and minimum spend, if needed to prevent unintended use. The coupon then unlocks Free Shipping only when an eligible subscription product is in the cart.
The Free Shipping method is a shipping option that appears only when its configured requirement is met. A free shipping coupon is a trigger that can satisfy the requirement when a valid free shipping coupon is selected. Both must be set correctly for the free shipping option to display at checkout.
Use a staging site or a restricted test coupon and place a subscription order using multiple addresses that match different shipping zones. Verify the shipping method appears at checkout, then confirm the same logic on the renewal order by generating or simulating a renewal. Document the exact zone, method, and requirement settings used so results remain consistent after updates.


