
When it comes to building a successful WooCommerce store, ensuring that your products are displayed efficiently can make a huge difference in user experience and conversion rates. With the ever-increasing competition in the e-commerce space, optimizing your WooCommerce product display is crucial. In this blog, we’ll explore key strategies for enhancing your WooCommerce product pages, from troubleshooting display issues to customizing your WooCommerce website for maximum impact, ensuring a seamless shopping experience for your customers.
Why Optimizing Your WooCommerce Product Display Matters
A well-optimized WooCommerce product page does more than just show off your products; it significantly impacts your store’s performance, sales, and user experience. Here are a few reasons why you should prioritize optimizing your product display:
- Improved User Experience: Customers are more likely to stay on your site longer if your products are displayed clearly, with relevant information like descriptions, prices, and availability.
- Higher Conversion Rates: A seamless shopping experience leads to more conversions. Customers who find what they need easily and quickly are more likely to complete a purchase.
- Better Search Rankings: Well-optimized product pages can help you rank higher in search results, driving more organic traffic to your store
- Reduced Bounce Rates: When your product pages are easy to navigate, with clear call-to-action buttons and product details, customers are less likely to leave your site without making a purchase.
Optimizing your WooCommerce product display should be a priority for any serious eCommerce business. In the following sections, we’ll explore how to achieve this goal.
How to Customize WooCommerce Product & Shop Pages (Step-by-Step)
Customizing your WooCommerce product and shop pages is essential to creating a seamless shopping experience for your customers. Whether you want to show all products on one page, display product descriptions directly on the shop page, or highlight specific attributes, WooCommerce offers a variety of customization options to suit your needs. In this step-by-step guide, we’ll walk you through how to make these changes and optimize your store.
How to Show WooCommerce Products on a Page
By default, WooCommerce displays a set number of products per page. However, change this to display all your products on a single page or adjust the number of products per page to fit your store’s needs. Here’s how to show products on a page in WooCommerce:
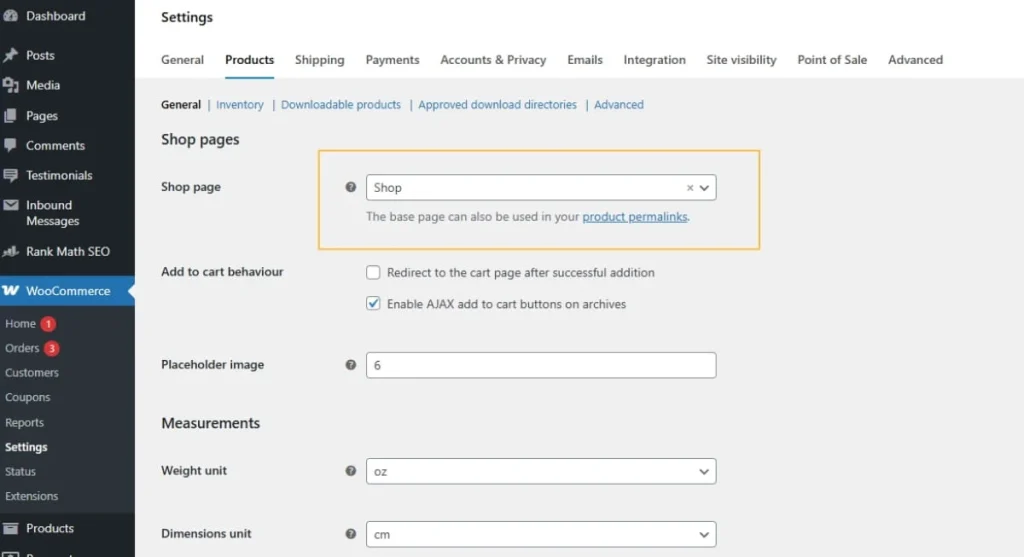
Step 1: Access the WooCommerce Settings
- Go to your WordPress Dashboard.
- Navigate to WooCommerce > Settings.
- In the settings menu, click on the Products tab.
 Step 2: Set Products per Page
- Under the Product Catalog section, you’ll find an option called Products per row and Rows per page.
- Adjust these settings to show the desired number of products per page.
- Save your changes.
If you want to display all products on one page, you can use a plugin like WooCommerce Shop Page to achieve this effect. This will prevent pagination and load all your products at once.
How to Show All Products on One Page in WooCommerce
Sometimes, customers prefer to view all available products on a single page. WooCommerce’s default settings usually break up products into multiple pages, but you can customize this easily.
Step 1: Install the Plugin
- From your WordPress Dashboard, go to Plugins > Add New.
- Search for WooCommerce .
- Click Install Now and then Activate the plugin.
 Step 2: Configure the Plugin
 Step 2: Configure the Plugin
- Once the plugin is activated, go to WooCommerce > Settings.
- Under the Products tab, select Display.
- Enable the option to show all products on one page, then save your settings.
This customization ensures customers can browse through all your products without navigating through multiple pages.
How to Show Product Description on the Shop Page in WooCommerce
Showing product descriptions directly on the shop page can enhance the shopping experience by providing more information without the need to click into each product page.
Step 1: Install a Customizer Plugin
To display product descriptions on the shop page, you’ll need a page customizer like WooCommerce Customizer or a similar plugin that adds product description functionality to the shop page.
Step 2: Customize the Product Page
- Go to your WordPress Dashboard.
- Navigate to Appearance> Customize.
- Under WooCommerce > Product Catalog, you should see an option for Product Descriptions. Enable this setting.
- Save the changes and refresh your shop page to view the product descriptions displayed on the main page.
This customization ensures that each product description is visible on the shop page, making it easier for customers to decide on their purchase.
How to Show SKU on WooCommerce Product Page
The SKU (Stock Keeping Unit) is a unique identifier for each product in your Inventory. Displaying it on the product page can help customers easily identify products, especially when they’re ordering in bulk or seeking specific items.
Step 1: Add SKU to the Product Page
- Go to the WordPress Dashboard and navigate to WooCommerce > Settings.
- Under the Products tab, select Inventory.
- Enable the Show SKU on Product Pages option.
This will display the SKU on your WooCommerce product page.
How to Show Attributes on Product Page WooCommerce
Displaying product attributes on the product page is an excellent way to provide customers with additional details, such as size, color, or material, to help them make an informed purchasing decision.
Step 1: Enable Product Attributes
- From the WordPress Dashboard, go to Products > Attributes.
- Add the attributes you want to display, such as size, color, or material.
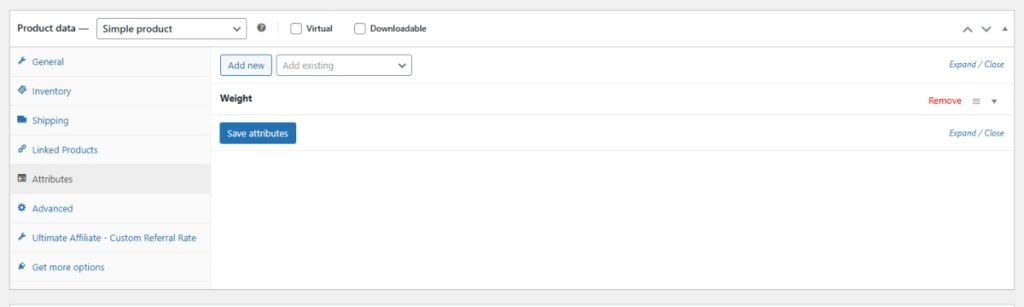
- Edit the product where you want to show these attributes.
- Scroll down to the Product Data section and navigate to the Attributes tab.
- Add the relevant attributes to this product and check the option to Show on the product page.
- Save the product.
 Step 2: Customize the Display (If Needed)
 Step 2: Customize the Display (If Needed)
If the attributes aren’t showing as you’d like on the product page, you may need to tweak the product page layout. You can either use a page builder like Elementor to modify the product template or use custom CSS to change how the attributes appear on the page.
For example, if you’re using Elementor:
- Edit the product page with Elementor.
- Use the WooCommerce Product widget to add the attribute section where you need it.
By following these steps, you can ensure that all product attributes are visible on the product page, making it easier for customers to find the information they need.
These simple customizations can greatly enhance your WooCommerce store’s functionality and user experience. Whether you’re looking to display more products on a single page, show detailed descriptions, or include important product information like SKU and attributes, WooCommerce provides a variety of tools and options to achieve your goals.
How to Fix WooCommerce Display Issues: Products, Prices, and Images Not Showing
WooCommerce is a powerful eCommerce platform, but like any other system, it can sometimes encounter display issues that affect how your products, prices, and images are shown. These issues can be frustrating for both store owners and customers, leading to lost sales and a negative shopping experience. In this guide, we’ll walk you through common WooCommerce display problems, such as products not showing on the shop page, missing prices, and product images not appearing, along with the steps to fix them.
 WooCommerce Products Not Showing on Shop Page
 WooCommerce Products Not Showing on Shop Page
If your WooCommerce products are not showing up on your shop page, this can severely impact your store’s functionality and sales. Several factors can cause this issue, but here are the most common reasons and their solutions:
Step 1: Check Product Visibility Settings
Go to your WordPress Dashboard and navigate to Products > All Products.
- Select the product that’s not displaying.
- Under the Product Data section, make sure that the product is marked as Published and the Catalog visibility is set to Public. Sometimes, products can be accidentally set to Private or Hidden.
Save your changes.
Step 2: Clear Cache and Browser Data
Sometimes, display issues are due to cached data, either on the server or your browser. To resolve this:
- Clear your browser cache and cookies.
- If you’re using a caching plugin, such as WP Super Cache or W3 Total Cache, clear the cache via the plugin settings.
Step 3: Deactivate Plugins and Switch Themes
If the issue persists, it could be due to a theme or plugin conflict. Here’s how to troubleshoot:
- Deactivate all non-WooCommerce plugins.
- Switch to a default WordPress theme, like Storefront, to check if your current theme is causing the issue.
- Reactivate your plugins one by one to identify the culprit.
WooCommerce Price Not Showing on Product Page
Displaying prices correctly is critical for a smooth shopping experience. If the price is not showing on your WooCommerce product page, here’s how to resolve the issue:
Step 1: Verify Product Price Settings
- From the WordPress Dashboard, go to Products > All Products.
- Edit the product in question.
- In the Product Data section, ensure that the Regular Price and Sale Price fields are filled in.
- Save the product to apply the changes.
Step 2: Check Currency and Location Settings
- If the price is still missing, it may be an issue with your currency or location settings:
- Navigate to WooCommerce > Settings > General.
- Ensure that the Currency options are correctly set for your store’s location.
Step 3: Check for Theme or Plugin Conflicts
- If the price still isn’t showing, there may be a conflict with your theme or plugins:
- Switch to the default Storefront theme temporarily and check if the price appears.
- Deactivate all non-WooCommerce plugins and check if the issue persists.
WooCommerce Reviews Not Showing on Product Page
Customer reviews play a vital role in building trust and driving sales. If reviews are not showing up on your product page, follow these troubleshooting steps:
Step 1: Enable Product Reviews
- Go to WooCommerce > Settings.
- Under the Products tab, click on General.
- Make sure that Enable product reviews is checked.
- Save the settings.
Step 2: Check Review Settings in Product Page
- Edit the product that isn’t displaying reviews.
- Under the Product Data section, make sure that the Allow Reviews checkbox is selected.
- Save the changes.
Step 3: Clear Cache and Browser Data
As with other display issues, cached data could be preventing reviews from showing. Clear your browser cache and any website caching you have in place.
Step 4: Disable Caching for Product Pages
If you’re using a caching plugin like WP Super Cache or W3 Total Cache, make sure that product pages are excluded from being cached. Cached product pages may prevent new reviews from appearing.
WooCommerce Variations Not Showing on Product Page
WooCommerce allows store owners to create products with variations (such as size or color). However, sometimes these variations don’t show on the product page. Here’s how to fix it:
Step 1: Ensure Variations Are Enabled
- Edit the product in the Products section.
- In the Product Data section, navigate to the Attributes tab and make sure that the attribute is set to Visible on the product page.
- Go to the Variations tab and ensure that the variations are properly created and published.
- Save the product.
Step 2: Check for Plugin or Theme Conflict
- Sometimes, conflicts with plugins or the active theme can prevent product variations from displaying correctly. Here’s how to check:
- Deactivate all non-WooCommerce plugins and see if the issue persists.
- Switch to the default Storefront theme temporarily to check if your theme is the issue.
Step 3: Clear Caches
If you have caching plugins installed, be sure to clear the cache, as this can sometimes prevent new product variations from showing on the page.
WooCommerce Product Image Not Showing on Shop Page
Product images are essential for an attractive and functional WooCommerce store. If your product images are not showing up on the shop page, follow these troubleshooting steps:
Step 1: Check Image File Format and Size
- WooCommerce recommends using JPEG or PNG files for product images. If your images are in an unsupported format or too large, they may not display correctly. Here’s how to check:
- Navigate to WooCommerce > Settings > Products > Display.
- Ensure the Product Images settings match the recommended dimensions (e.g., 600 x 600px for thumbnails).
- Resize or reformat images as needed.
Step 2: Regenerate Thumbnails
- WooCommerce sometimes has issues with resized or newly uploaded images. You can fix this by regenerating thumbnails:
- Install the Regenerate Thumbnails plugin.
- Once activated, go to Tools > Regenerate Thumbnails.
- Click Regenerate Thumbnails for All Attachments.
Step 3: Disable Theme or Plugin Conflicts
- Switch to the default Storefront theme temporarily to see if your theme is causing the problem.
- Deactivate all non-WooCommerce plugins and check if the issue is resolved.
Display issues like products, prices, images, and reviews not showing on WooCommerce product pages can hurt your store’s performance. By following the troubleshooting steps outlined above, you can resolve these problems and create a seamless shopping experience for your customers. If you continue facing difficulties, it may be worth working with a WooCommerce development agency in New York or a WooCommerce web development agency to resolve complex issues and enhance your site’s functionality.
How to Show Shipping Costs, Categories, and Images on Your WooCommerce Site
Creating a seamless shopping experience for your customers is crucial when running an e-commerce store. One of the most important aspects of a smooth shopping journey is ensuring that key details, such as shipping costs, product categories, and images, are easily accessible. In this guide, we’ll walk you through how to display these essential elements on your WooCommerce site, along with some additional tips on showing related products, product categories, and images during checkout.
Show Related Products on Product Page
 Show Related Products on Product Page
WooCommerce automatically displays related products on product pages. However, you can enhance this feature to improve the user experience and increase sales. Related products help customers discover other items that might interest them, which can lead to higher conversion rates.
Step 1: Enable Related Products
By default, WooCommerce will show related products based on product categories and tags. To ensure this feature is working correctly:
- Go to WooCommerce > Settings in your WordPress dashboard.
- Click on the Products tab and select Related Products under the Product Catalog section.
- Make sure the Related Products option is enabled.
- Save changes.
Step 2: Customize Related Products (Optional)
If you want to change the default settings for related products:
- Install a plugin like WooCommerce Customizer or YITH WooCommerce Related Products Manager.
- Customize how related products are displayed, such as the number of products shown, the layout, and the filtering options.
Step 3: Ensure Products Have Proper Tags and Categories
To make sure the related products are relevant, tag your products with appropriate categories and attributes. This way, WooCommerce can pull related items based on shared characteristics.
Show Product Categories on Shop Page
Displaying product categories on your WooCommerce shop page can make it easier for customers to navigate and find what they’re looking for. Here’s how you can add category listings to your shop page:
Step 1: Display Categories on Shop Page
- From your WordPress Dashboard, go to Appearance> Customize.
- Under the WooCommerce > Product Catalog section, enable the option to display product categories on the shop page.
- Save the changes and refresh your shop page to see the categories appear.
Step 2: Customize Category Display (Optional)
You can further customize the way categories are displayed by editing the Shop Page template in your theme or by using a page builder like Elementor:
- Use the WooCommerce Product Categories widget to display categories.
- Adjust the number of products shown per category or add custom filters to refine the browsing experience.
Step 3: Use Plugins to Improve Category Display
For more advanced category displays, you can use plugins like WooCommerce Category Accordion or Product Categories Designs for WooCommerce to enhance the way your categories appear on the shop page.
Show Product Image on Checkout Page
Displaying the product image on the checkout page is a great way to remind customers of their purchases and create a more polished, professional shopping experience. Here’s how to display product images on your WooCommerce checkout page:
Step 1: Use a Plugin for Product Images on Checkout
WooCommerce doesn’t display product images by default on the checkout page. However, you can easily add them with a plugin like WooCommerce Checkout Manager or WooCommerce Checkout Fields Editor.
- Go to Plugins > Add New and search for WooCommerce Checkout Manager.
- Install and activate the plugin.
Step 2: Add Product Image to Checkout Page
- Once the plugin is activated, go to WooCommerce > Checkout Fields.
- Find the Order Items section and enable the option to display product images.
- Customize the size and placement of the product images.
- Save the settings and refresh your checkout page.
Show Shipping Cost on Product Page
Displaying the shipping cost directly on the product page is a great way to give customers transparency about additional costs before they check out. While WooCommerce doesn’t show the shipping cost directly on the product page by default, you can achieve this by enabling the shipping calculator and configuring shipping zones.
Step 1: Enable Shipping Calculator
- Go to WooCommerce > Settings > Shipping.
- Under the Shipping Zones tab, configure your shipping zones and methods (Flat Rate, Free Shipping, Local Pickup).
- Go to WooCommerce > Settings > Shipping > Shipping Options and enable the Shipping Calculator on the Cart Page.
This will display the shipping cost on the cart page, but if you want to show it on the product page, you can use a plugin like WooCommerce Shipping Calculator on Product Page or use custom coding to add a shipping cost estimator next to the product.
Step 2: Add Shipping Cost Display to Product Page
- Install the WooCommerce Shipping Calculator on Product Page plugin.
- Once activated, configure the plugin to display shipping costs on individual product pages based on the customer’s location.
This will display the shipping cost below the product details.
Displaying key information like related products, categories, images, and shipping costs on your WooCommerce site can greatly enhance the shopping experience for your customers. With the steps outlined above, you can make your site more user-friendly and visually appealing, ultimately leading to better engagement and conversions.
Advanced WooCommerce: How to Show Quantity, Stock, and Variations
WooCommerce offers a powerful platform for selling products. However, the more details you display on your product pages, the better your customers’ shopping experience will be. Advanced product information, such as quantity, stock status, total price, and variations, can significantly enhance usability and transparency. In this article, we’ll walk through how to display these key elements, making your product pages more informative and user-friendly.
Show Quantity on Product Page
 Show Quantity on Product Page
Displaying the available quantity of a product on the product page helps customers understand how many units are in stock. It can also prompt them to buy sooner if the Inventory is limited.
How to Show Quantity on Product Page:
By default, WooCommerce doesn’t display the available quantity on product pages. However, you can easily add it with a few steps:
Use a Plugin
- Install and activate the WooCommerce Customizer plugin.
- Navigate to WooCommerce > Settings > Products and enable the Display Stock Quantity option.
- Save your settings. This will display the available quantity under the product price on the product page.
Tip: Displaying stock quantity is especially useful for products with limited availability, as it creates a sense of urgency and can encourage customers to purchase sooner.
Show Stock Status on Product Page
Showing stock status on the product page helps customers know whether the product is in stock, on backorder, or out of stock. This can prevent confusion and improve the customer experience by setting expectations.
How to Show Stock Status:
- From the WordPress Dashboard, go to WooCommerce > Settings.
- Navigate to the Products tab and select Inventory.
- Make sure the Display Stock Availability option is checked.
- Save your settings.
Tip: Make stock status clear to customers, especially for high-demand items, to avoid disappointment. Consider adding an “Email when back in stock” option for out-of-stock products to capture leads.
Show Tags on Product Page
Product tags are a great way to categorize and make products more discoverable. Displaying product tags on the product page allows customers to see related products with similar attributes or themes.
How to Show Tags on Product Page:
- Go to the WordPress Dashboard and navigate to Products > Tags to add tags to your products.
- On the product edit page, scroll down to the Product Data section and add the relevant tags.
- To display these tags on the product page, use a plugin like WooCommerce Product Tags or manually customize your theme.
Tip: Product tags are helpful for customers searching for specific features (e.g., “organic,” “vegan,” “sale”). Displaying tags can lead to better product discovery and increase the likelihood of cross-selling.
4. Show Total Price on Product Page
Displaying the total price on the product page, including any discounts or add-ons, helps customers quickly see how much they’ll pay. This is particularly useful for products with multiple variations, add-ons, or discounts applied.
How to Show Total Price on Product Page:
WooCommerce automatically shows the total price for simple products. However, for variable products, displaying the total price based on the chosen variation is more complex.
Show Price for Variable Products
To display the total price on the product page for variable products, WooCommerce does this automatically. However, if you want to show the price dynamically as the customer selects variations, you can use the following JavaScript to update the price on variation change.
Using a Plugin
For more advanced pricing options, you can use the WooCommerce Dynamic Pricing plugin to calculate the total price with applied discounts, add-ons, and variations.
Tip: Display the total price prominently to ensure customers know exactly what they’re paying, including any additional charges such as shipping or taxes.
Show Product Variations on Shop Page
Displaying product variations (like sizes, colors, or styles) on the shop page can help customers make quicker decisions without needing to navigate to the individual product page.
How to Show Variations on the Shop Page:
- Use a Plugin: Install a plugin like WooCommerce Show Variations on Shop Page to display product variations directly on the shop page.
- Theme Customization: For more control, you can customize your theme’s shop page template (e.g., archive-product.php) to display variations as part of the product listing.
Tip: By displaying variations directly on the shop page, customers can see options like size or color before clicking through to the product page, which can streamline their shopping process and increase sales.
By displaying key product information like quantity, stock status, tags, total price, and variations, you can significantly improve the shopping experience on your WooCommerce store. These elements provide more transparency, help customers make informed purchasing decisions, and encourage engagement with your products.
5 Essential Elements Every WooCommerce Product Page Needs
A well-optimized product page is crucial for driving conversions and providing a seamless shopping experience on your WooCommerce store. By strategically displaying key elements, you can encourage customers to explore more products, make informed purchasing decisions, and complete their transactions. In this article, we’ll walk you through five essential elements that every WooCommerce product page should include to enhance user experience and increase sales.
Show Discount on Product Page in WooCommerce
Discounts are a great way to attract customers and boost conversions. Displaying discounts clearly on the product page can encourage potential buyers to complete their purchase. WooCommerce provides an easy way to show discounts, whether they are part of a seasonal sale, flash promotion, or permanent price reduction.
How to Show a Discount:
- Set Sale Price: When editing a product in WooCommerce, you can set both a Regular Price and a Sale Price. The sale price will be displayed prominently on the product page, often with a strikethrough on the regular price.
- Display Sale Badge: Many themes include an option to display a Sale Badge on the product image. If your theme doesn’t support this, you can use plugins like WooCommerce Sale Flash to automatically display a sale badge when a product is on sale.
Tip: Make sure the discount is clear and easy to understand. For example, if you’re offering a 20% discount, showing both the original and discounted price, along with a “20% OFF” label, will help make the offer irresistible.
Show Cross-Sells on Product Page
Cross-selling is an effective strategy to increase the average order value by suggesting complementary products. For example, if a customer is buying a smartphone, you could show accessories like phone cases or chargers. WooCommerce makes it easy to display cross-sells on the product page.
How to Show Cross-Sells:
- In the Product Data section, when editing a product, go to the Linked Products tab.
- In the Cross-sells section, start typing the products you want to recommend and select them.
- Save your changes.
Once this is done, the recommended cross-sell products will appear on the product page, usually below the main product details or in a dedicated section.
Tip: Be strategic with your cross-sells. Make sure the products you recommend are truly complementary to the main product to increase the likelihood of an add-to-cart action.
Show Free Shipping on Product Page
Free shipping is one of the most popular incentives that drives conversions in e-commerce. Displaying free shipping on product pages can reassure customers and reduce cart abandonment. WooCommerce allows you to display free shipping prominently on the product page.
How to Show Free Shipping:
- Set up Free Shipping Method: Go to WooCommerce > Settings > Shipping and set up a free shipping method. You can offer free shipping for orders over a certain amount or to specific locations.
- Display Free Shipping on Product Pages: To showcase free shipping on individual product pages, you can add a banner or note on the product page. This can be done manually through the Product Description field or by using a plugin like WooCommerce Free Shipping Bar to automatically display a free shipping message when the conditions are met.
- Custom Text in the Cart: You can also add a free shipping notice to the cart or checkout page, reminding customers of the offer.
Tip: Make sure the free shipping message is visible, clear, and enticing. A small “Free Shipping on Orders Over $50” label is an effective way to draw attention.
Show Brand on Product Page
Displaying the brand of a product can help customers make quicker decisions, especially when they are loyal to certain brands. Showing the brand name or logo on your WooCommerce product page can build trust and credibility, making it easier for shoppers to find what they want.
How to Show Brand:
- Use a Plugin: Many WooCommerce themes don’t display the brand by default. However, you can use a plugin like WooCommerce Brands to add brand information to your product pages.
- Add Brand Information Manually: If you prefer not to use a plugin, you can manually add the brand name to the Product Short Description or the Product Data section.
After you add the brand, the logo or name can be displayed above or below the product title, depending on your theme and customization settings.
Tip: To make the brand stand out, consider displaying the brand’s logo on the product image or in the product description section. This helps reinforce the brand’s identity.
Show Category Image on Product Page
Showing the category image on the product page is a smart way to reinforce your site’s organization and help customers navigate to similar products easily. This is particularly helpful for large stores with many product categories.
How to Show Category Image:
- Category Settings: Go to Products > Categories in your WordPress dashboard and edit each category. You can upload an image to represent the category.
- Use a Plugin: If you want to display the category image directly on the product page, you can use a plugin like WooCommerce Category Images or customize your theme to display the category image.
Tip: Use the category image to create a visually appealing and user-friendly shopping experience. This can guide customers to similar products and encourage them to explore more of your offerings.
Choose the Right WooCommerce Development Service
In today’s competitive e-commerce landscape, optimizing your WooCommerce product display is essential for ensuring a smooth shopping experience. Whether you’re troubleshooting product display issues or looking to enhance your site with custom features, there are several ways to improve your WooCommerce store’s functionality.
If you’re looking for expert assistance in optimizing your WooCommerce site, consider hiring a WooCommerce website development agency in New York, USA. A reliable WooCommerce development company in the USA will help you overcome display issues, optimize your product pages, and boost overall sales performance.
For more advanced design and development needs, partnering with a WooCommerce website design team ensures your site is not only functional but also visually appealing and user-friendly.
For a professional touch and expert-level WooCommerce optimization, contact our team at Apso Tech, a leading WooCommerce website development agency in the USA, for top-tier solutions tailored to your business needs.
Tools to Enhance Your WooCommerce Product Display
In addition to the built-in options in WooCommerce, several tools and plugins can enhance the way your products are displayed. Consider the following:
- WooCommerce Product Add-Ons: This plugin allows you to add extra options (like gift wrapping, engraving, or custom messages) to your products, improving the customer shopping experience.
- WooCommerce Customizer: For store owners who want to tweak product pages without touching the code, WooCommerce Customizer is a great option. It provides an easy-to-use interface for customizing the Appearance of product pages.
- Product Page Builders: Plugins like Elementor and WPBakery Page Builder offer drag-and-drop functionality to create beautiful, customized product pages.
By utilizing these tools, you can optimize your WooCommerce product display without needing extensive coding knowledge.
Why Work With a WooCommerce Development Agency
When it comes to fine-tuning your WooCommerce product display, a WooCommerce development agency in New York can provide the expertise and experience needed to deliver a polished and optimized store. A specialized WooCommerce web development agency can help ensure that your site is tailored to your business needs and optimized for performance.
If you’re looking to enhance your WooCommerce store, consider partnering with a professional WooCommerce website development agency in the USA. With the right help, you can ensure your product display is sleek, functional, and fully optimized for conversions.
Conclusion
Optimizing your WooCommerce product pages with essential elements like quantity, stock status, tags, total price, and variations can significantly enhance your customers’ shopping experience and increase conversions. By providing more detailed and transparent information, you help customers make informed decisions, reduce friction during the purchasing process, and ultimately drive higher sales.
Whether you’re showcasing the available quantity and stock status, displaying product variations directly on the shop page, or highlighting important details like tags and the total price, each of these features adds value to your store and boosts user engagement. These enhancements, while simple to implement, can make a substantial difference in how your customers interact with your site.
With these adjustments, you’ll not only improve your store’s usability but also position it for long-term success by ensuring your customers have the best possible experience from browsing to checkout.
Frequently Asked Questions (FAQ’s)
WooCommerce is an open-source WordPress plugin that enables users to create and manage an online store. It integrates with WordPress, allowing store owners to sell physical or digital products, manage inventory, process payments, and track orders seamlessly.
To install WooCommerce, go to your WordPress dashboard and navigate to Plugins > Add New. Search for “WooCommerce,” click Install Now, and then Activate. The plugin will guide you through the initial setup process to configure your store.
WooCommerce product variations allow store owners to offer multiple options for a single product, such as different sizes, colors, or styles. These variations are created within the product page, enabling customers to select their preferred option before adding the item to their cart.
WooCommerce provides a built-in inventory management system that allows you to track product stock levels. You can enable stock management from the product settings, set stock quantities, and receive notifications when stock is low or out.
Yes, WooCommerce supports the sale of digital products such as eBooks, software, music, or PDFs. You can upload the files directly to product pages, and customers can download them after completing their purchase.
WooCommerce supports a wide range of payment gateways, including PayPal, Stripe, bank transfers, and credit/debit card processing. It also offers additional gateways through plugins, allowing for flexible payment options based on location and business needs.
Shipping settings in WooCommerce can be configured through WooCommerce > Settings > Shipping. You can set shipping zones, methods, and rates, including flat rate, free shipping, or local pickup. Advanced options, like real-time carrier rates, can be added using plugins.
The WooCommerce product page layout typically includes the product title, description, price, images, add-to-cart button, and related products. It can be customized to include additional elements like reviews, shipping information, and product variations.
To optimize your WooCommerce store for SEO, focus on optimizing product titles, descriptions, images, and URLs. Use structured data (schema markup) for rich snippets, optimize for mobile devices, and ensure fast loading speeds to improve visibility and rankings on search engines.


